Wash Hands Thoroughly

IMG_7815.png

To promote hygiene and health awareness, I started to put together a series of cartoons on the topic of ‘wash hands thoroughly’.

Here are the first three.

IMG_7737.png

Octopi are always so much fun to draw.

IMG_8033.png

I’m surprised that the spaniel has just leapt into the bowl. Actually, I think the ears neede to be a little bigger for it to be a spaniel.

I out out a Cartoon Newsletter with a whole host of characters and occasional cartooning tips. Add your name and best email address below, and I’ll wing a copy your way.

Gerald On Easter Island

This is an illustration the I drew to help illustrate the ‘Story Tails - Storytelling for Cartoon Strips’ course. I wanted an image go go along with the phrase “It doesn’t have to be set in stone, and for some reason the heads on Easter Island popped into my head.

Seeing as I hadn’t drawn an Easter Island cartoon before, or at least not for a very long time, I thought this would fit the bill.

IMG_9213.png

Here’s the finished cartoon, now let’s go back and look at the steps involved in creating it.

IMG_9201.png

Here’s the initial outline.

IMG_9208.png

’m now starting to add colour. I’m using digital watercolour in Procreate and dapping on different tones at 30% opacity to slowly build up a stone effect.

IMG_9209.png

I’m now adding washes for the grass. Gerald is on a transparent layer, which is why you can see straight through him. I’ll apply another layer under the transparency later on and colour in under him white.

IMG_9210.png

I’m well underway with the sky now, I though that a dramatic looking sky would work well with the statue.

IMG_9213.png

And here’s the finished picture again. I decided to add a lot of darker tones to the pic to make it more dramatic still. It looks as though there is a storm rolling in, which almost creates a story within the cartoon of what’s going to happen next.

What’s next?

I put out a Cartoon Newsletter with a whole host of characters and occasional cartooning tips. Add your name and best email address to the form below, and I’ll wing a copy your way.

IMG_6988.png

Evolution Of A Cartoon Character

IMG_9183.png

One block that people sometimes have when creating a character is delaying releasing it out into the world because they’re not quite sure whether it looks right or should be more fully formed.

Lots of well known cartoon characters have started out in one form and then slowly changed over time.

Everything changes over time, so there’s no reason why your own cartoon character should be any different.

In can be a lot of fun to simply out a character out there and then see how they develop. Also, when people see your character, they might give you some comments about your character which you could then take on board.

In this article I’m going to look at the evolution of my most popular character, Gerald the Goat.

Gerald the Goat’s first appearance.

IMG_7507.jpeg

Here is Gerald’s very first appearance.

Gerald didn’t even start off life as a main character. I’d already started drawing a character called Stan. He featured in some simple strips that I didn’t even get around to thinking up a name for.

As you can see in the above strip, a random goat showed up to the bouquet intended for Stan’s girlfriend. Although it was intended to be a one-off appearance, the goat ended up sticking around and soon ended up with the name Gerald. Shortly after that the strip itself was named ‘Gerald the Goat’, and Stan had to share the spotlight with Gerald.

IMG_9184.jpeg

Here’s one of the early Gerald strips. As you can see, he’s still pretty simply at this point. He probably continued in this form for about thirty strips.

I didn’t even bother with backgrounds at this point, it was just the simply characters, with a little shadow underneath.

IMG_9172.jpeg

At this point, there wasn’t really a cast, it just Gerald and Stan, with an occasional nameless character appearing who would invariably be butted away.

The strips at this point mainly consisted of Gerald thing and butting people, and while that wa a lot of fun to think up, I realized that it would soon become stale, and that it would be more interesting to think up some different material for gags.

IMG_9189.jpeg

To take Gerald off into an occasional entirely different direction entirely, I introduced the space goat.

It was time to assemble a cast of characters.

A couple of characters had already made an appearance.

IMG_9187.jpeg

Rex police dog was an early attempt to introduce someone to keep Gerald in line…somewhat unsuccessfully….

I wanted a human character to do some of the thing that Gerald was getting up to. And so I came up with the idea of misschevious old lady, Granny Mills, who is able to get away with things due to her advanced age.

Shapoklyak show with Cheburashka on the right.

Shapoklyak show with Cheburashka on the right.

One of the characters Granny Mills was based on was an exceedingly mischevious old lady called Shapoklyak who appeared in the Russian stop-motion animated films which featured the popular character Cheburashka.

The old battle axe’s old battle axe.

The old battle axe’s old battle axe.

The other was Giles’ Grandma character.

After Granny Mills debuted there started to be the first strips that didn’t feature the title character.

IMG_9186.jpeg

Soon after I introduced Granny Mills, I realised that Rex the police dog was unable to control Gerald, and so I needed someone to keep him in line.

IMG_9185.png

I introduced the bull, who chased Gerald around for a bit, but this didn’t really work as bulls and goats are not natura enemies. And my search for a proper antagonist for Gerald went on.

IMG_0805.jpeg

The first big change to Gerald himself was giving him more complex eyes so tht he could show a greater range of emotion. You can also see in the above cartoon that I started to creat simple backgrounds using washes.

IMG_2731.jpeg

At this point the cast consisted of the main characters of Gerald, Stan, and Granny Mills, with occasional appearances by Rex and Little Ivy, and increasingly fleeting roles for the bull.

I also introduced the device of Granny Mills ‘borrowing pets’ from the local zoo, which enabled to have some fun drawing different animals.

IMG_9176.jpeg

Stan’s girlfriend seemed not to be deterred by the fact that her boyfriend was having goat-control issues and also popped into the strip from time-to-time.

I’d already introduced the device of Granny Mills’ ‘borrowing’ pets from the zoo, which got me thinking about what else could be lurking inside the zoo that could be more of a bother for Gerald.

As Gerald was supposed to be some sort of mountain goat, I thought I’d research animals prey on goats in the wild, and came up with a leopard.

Enter the snow leopard

IMG_9171.jpeg

It’s very early days with the snow leopard at the moment. She’s still stuck inthe zoo, so I’m trying to think up some inventive ways inwhich she can break out and hassle Gerald.

It was only fairly late on in the strip that the characters started to talk. For along time ther was only a narrator describing what was going on.

IMG_9191.png

So that brings the cast more or less up to date.

It will be fun to see where it develops from here.

IMG_7454.png
IMG_9175.png

Developing Your Characters

IMG_9103.png

Have you ever felt that a character you’ve just created is just a bit plain and grey…that it needs more spark and personality about it?

Of course you could suddenly inject your character with some more character with a sudden zap of colour…

IMG_9104.png

But not every rabbit gets to be pink…

…and not every character has to be colourful in appearance to stand out and develop more personality.

In this article we’re going to look at a few ideas to help you develop your character further.

Here’s what we’re going to cover:

  • putting yourself in your character’s shoes

  • putting your character in your shoes

  • your character’s relationship to others

  • another side to your character

  • character quirks

  • keeping a character diary

  • your character’s journey

Put yourself in your character’s shoes

IMG_9072.jpeg

Spend a few minutes over this and really try and put yourself into your characters shoes. Look at the character’s profile, and also any cartoons that you drew previously and feature the same character. How do you think they might act? In any sort of situation, you could ask yourself, what would XXX do?

Put your character in your shoes

IMG_9073.jpeg

We have all heard the expression “to put yourself in someone else’s shoes”, but how about putting the character into your shoes for a day.?

Here are a couple of points to ponder.

Everyday routine

Think about your own everyday routine. How might your character go about it differently? If it is a human character then they might have a slightly different way of doing something than you, but if it is an animal, then it might be very different.

Remember that it’s a cartoon, so animals get a comic licence to do human stuff. You could even quickly doodle your character going through some of the exact same parts of your daily routine, and then think about how you could put a twist on them.

This may not sound very exciting in terms of character development, however, our personality is made up of lots of little things that we do all the time, usually without thinking about them at all.

What makes you happy/annoyed/sad etc.

Think of things that make you feel different emotions. Would these be triggers be the same for your character? And even if they are, would they react in the same way?

Your character’s relationship to others

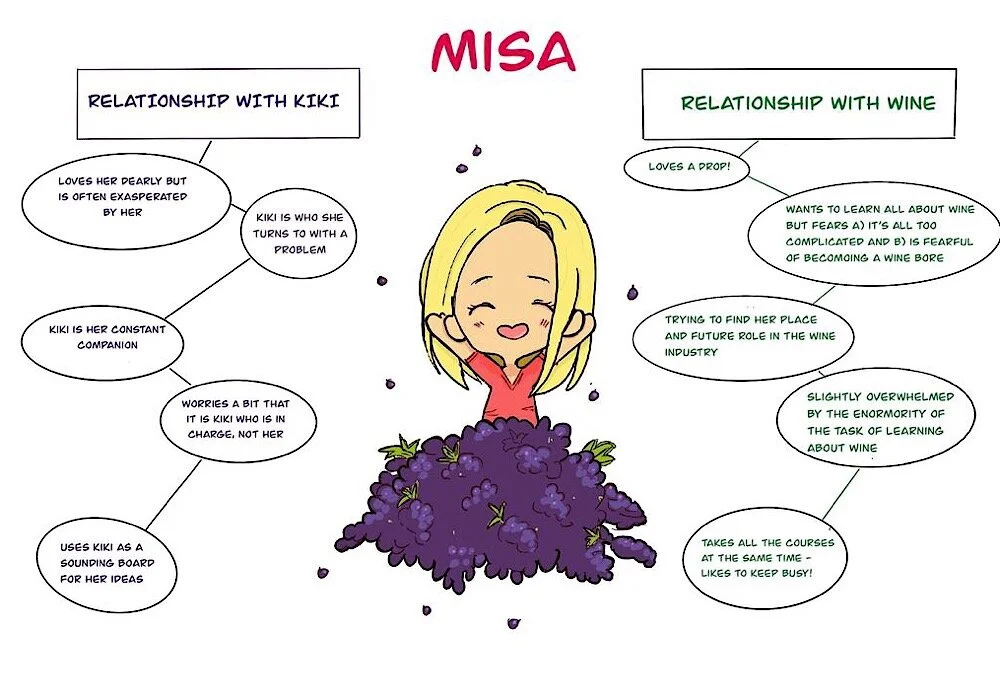
IMG_9098.jpeg

We form our personality in relationship to others.

We often react differently when we are around different people.

How might your character act with different people?

You can also think in terms of how your character might react with inanimate objects, such as the example with wine above.

We’ve all done this. You only have to think of experiences with a dodgy photocopier or a slow computer to realise that we do this all the time.

How could your character react to different objects in it’s world.

Another side to your character

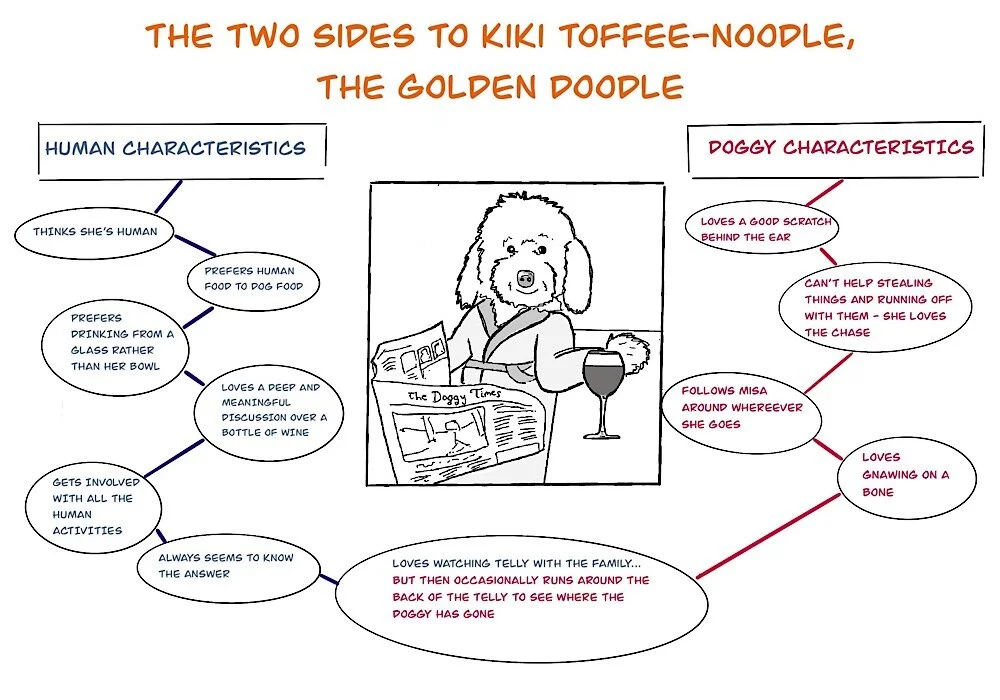
IMG_9099.jpeg

Many owners feel that their pet takes on some human characteristics. Ir is it perhaps we are taking some of our pet’s characteristics?

For an animal character, you could follow the example above and see what human characteristics you could apply to it.

Our own personality can change a lot throughout the day depending on factors such as energy level, stress etc.

Think about how your character’s personality might vary at different times of the day.

Thanks to Michelle Knight for supplying the above two examples.

Character quirks

IMG_9093.jpeg

We’ve all got quirky ways of doing things. If you don’t think you do, then just ask someone close to you to see what they have to say.

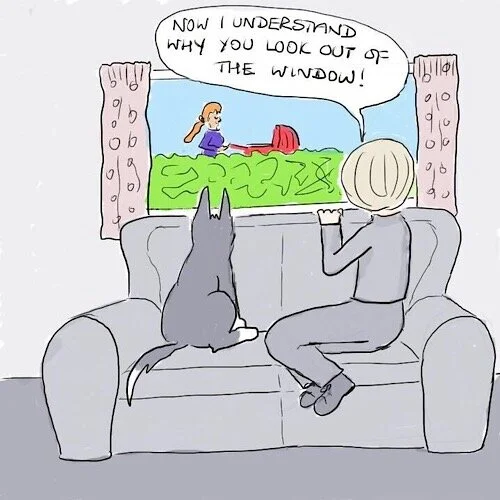
It’s a lot of fun to invest quirks for your character. So if a dog is often sitting looking out of a window, how does it sit, how does it react to different passers-by. Etc.

Food is a particular source of character quirks, both in terms of what you eat and how you eat it.

IMG_9095.png

Perhaps there is an activity that your character returns to again and again. In the example above it might be Gus the dog who loves to to turn any opportunity into either a tug-of-war or a wrestling match.

Thanks to Carol Clark, “The Doggy Doctor”, for supplying the two above examples.

You can find Carol:

https://www.downdog.co.uk/

Keep a character diary

IMG_9097.png

One thing that can help you to get inside your characters head is to keep a diary for them. This works for non-human characters as well. You don’t have to write much, just a sentence.

Your character’s journey

IMG_9109.png

Your character is only just beginning.

Think about how long it takes for people to develop their own personality and look. It’s no different for a cartoon character. It’s not going to hop fully-formed out into the world from the get-go.

Give them some time to evolve.

Rather than putting any sort of pressure on yourself about creating a great or complex character, start drawing what you’ve got and see where it leads to from there.

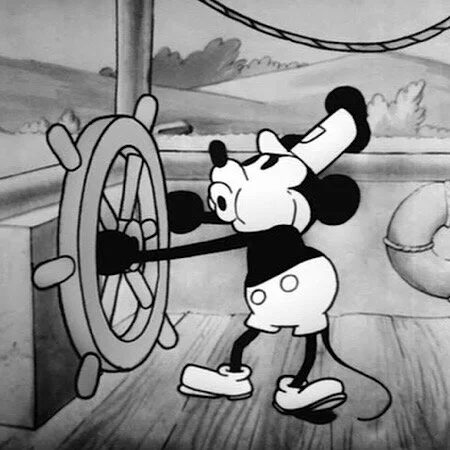
There are lots of examples of famous cartoon characters that have ended up quite a bit appearance and personality wise from their original form. Let’s take Mickey Mouse for an example.

Mickey Mouse appearing in ‘Steamboat Willie’ in 1928.

Mickey Mouse appearing in ‘Steamboat Willie’ in 1928.

And appearing a whole lot later.

And appearing a whole lot later.

Personally, I much prefer him in his younger incarnation, when he was basically, a bit of a wrong ‘un. Definitely not a very cute mouse!

IMG_9094.jpeg
IMG_9103.png

Here’s what we covered:

  • putting yourself in your character’s shoes

  • putting your character in your shoes

  • your character’s relationship to others

  • another side to your character

  • character quirks

  • keeping a character diary

  • your character’s journey

IMG_9117.png

How A Notepad Can Help Your Cartooning

Yuki never left home without a notepad. Bernard always followed her with backpad in case inspiration hit big time.

Yuki never left home without a notepad. Bernard always followed her with backpad in case inspiration hit big time.

Here’s how a humble notepad can end up being a greater aid to our cartooning than any sort of whizz-bang drawing tablet, iPad, or app.

Huh? How so?

Well, one of the biggest barriers to drawing cartoons is starting to draw in the first place. It doesn’t matter how much we spend on fancy hard or software if don’t actually use it.

Here’s a few reasons that notepads are neat:

  • they’re small and can easily fit in any pocket. 

  • because they’re cheap, you can buy a bunch of them and put them in different places so there’s always one to hand.

  • you can draw on them in an instant

I don’t know about you, but I have an annoying habit of mislaying my notepad just when I need it. I’ve gotten around this by keeping several notepads around.

Personally I don’t think this is my own absentmindedness....I blame it on the Spotted Stationary Snaffling Spatchett….

It is not sure why the Spotted Stationery Snaffling Spatchett likes stationery so much. It’s behaviour is somewhat similar to a magpie being attracted to shiny things, with paper and pens catching it’s eye instead.

It is not sure why the Spotted Stationery Snaffling Spatchett likes stationery so much. It’s behaviour is somewhat similar to a magpie being attracted to shiny things, with paper and pens catching it’s eye instead.

To ensure that you always have a notepad to hand, buy a bunch of cheap ones, and leave them in places where you can easily find them, such as:

  • In your coat pocket

  • In your jacket pocket

  • In your bag

  • In a drawer at work

  • By the coffee machine

  • Etc.

IMG_8795.png

Simply having a notepad on you, acts as a prompt to try drawing something. Even better if you can the notepads in bright colours so that they stand out and catch your eye. If you keep carrying around notepads for long enough, you’ll start to associate notepad = cartooning.

“She’s a beauty! Get sketching!”

“She’s a beauty! Get sketching!”

You never know when you might spot something cool to draw or when an idea might pop into your head. You might think that you can simply remember it and then write it down later, but how many times have we intended that only to end up forgetting later on?

If you get an idea, or even if you just spot something interesting, then make a note of it or do a quick doodle.

This is starting to form the habit of getting inspiration from the world around us. 

The more often we note what’s around us, and the more often we note it down, then the more often we are to notice subsequent things.

It’s almost as though we are developing our own radar to notice ideas.

Dealing with the blank page of doom

Okay, but that doesn’t mean that it eliminates the dreaded blank page of doom.

Sally stared st the blank page of doom…and it stared back…

Sally stared st the blank page of doom…and it stared back…

The blank page of doom is equally happy to stare at you from a $1 notepad or a $1000 tablet.

So how can we get around this?

With a notepad, you can seed it with ideas to doodle in advance.

At the top of a page, note an idea for something to doodle, such as cats.

Actually, that’s not specific enough, because then you have to think about what the cat is doing.

IMG_8882.jpeg

So come up with some more specific prompts, such as sleeping cats.

IMG_8883.jpeg

When you’re tired you don’t want to decide anything, and that can often mean you end up drawing anything at all. By seeding the notepad with prompts, it removes a barrier to stopping you from drawing.

The article in a nutshell

Notepads are good because:

  • You can take them anywhere

  • Easy to use

  • You can put them in convenient places

  • You can write drawing prompts in them.

I hope that the article was useful for you, and will encourage you to embrace the power of the humble notepad!

IMG_8884.png

How To Draw Everyday When You Don’t Have A Consistent Routine

We’ve all heard people talk about the importance of sitting down to draw or write at the same time everyday.

Those same people have probably also mentioned the importance of having a set place to do your creative work in, preferable on that’s use for that purpose only.

But what if you don’t have a fixed schedule or a set place where you can draw?

Maybe your life lacks routines, and your working hours vary from day-to-day, and perhaps also location to location.

In this article we’re going to look at some ideas to get you doodling everyday, regardless of your situation or whatever else might pop up in life.

Here’s what we’re going to cover:

  • Keep a notepad handy

  • Lightning doodles

  • Cartoon over coffee

  • Don’t break the chain

Keep a notepad handy

IMG_8795.png

Even though we may not a routine that makes time for drawing, we can take the ability to draw with use wherever we go by making sure to have a notepad and pen to hand at all times.

I don’t know about you, but I have an annoying habit of mislaying my notepad just when I need it. I’ve gotten around this by keeping several notepads around.

To ensure that you always have a notepad to hand, buy a bunch of cheap ones, and leave them in places where you can easily find them, such as:

  • In your coat pocket

  • In your jacket pocket

  • In your bag

  • In a drawer at work

  • By the coffee machine

  • Etc.

Simply having a notepad on you, acts as a prompt to try drawing something. Even better if you can the notepads in bright colours so that they stand out and catch your eye. If you keep carrying around notepads for long enough, you’ll start to associate notepad = cartooning.

Lightning doodles

IMG_8794.png

Sometimes the thing that stops us from starting to draw is the thought that we have to draw something complete or good. It’s better to consistently doodle any old thing - and doodle it quickly - than to wait around for the ‘perfect’ idea to appear and risk not drawing anything at all.

But what if I can’t think of anything to draw?

Don’t let that stop you from drawing. Preempt this by adding a topic at the top of each page in your notebooks. Some suggestions could be:

Cats

Dogs

Smiling faces

Coffee

Shopping

Etc.

When you see the prompt, don’t pause to think about it - just start doodling and see what happens.

Cartoon over coffee

IMG_8796.png

Regardless of how unpredictable or busy your day might be, there are still a number of activities you have to do everyday despite the uncertainty. One such activity is stopping to have a drink. So when you have chance for a coffee or other drink, use this as a prompt to get out a notepad, one of which you will have nearby you as a result of the previous suggestion.

If you do this a few times, then you’ll start to make the connection coffee=cartooning.

Don’t break the chain

IMG_8787.png

The comedian Jerry Seinfeld has a simple process when it comes to writing jokes: write something everyday. He doesn’t set out everyday to write something clever or good or even funny, it just has to be a joke. After he write the day’s joke, he applies a big red ‘X’ to a calendar.

Try doodling a simple cartoon everyday and then write your own big red X on your calendar. Before long you’ll have a growing chain of Xs - a visual reminder of the consistent work you’ve put it.

After that it’s simply a case of then applying Seinfeld’s golden rule:

Don’t break the chain

Here’s what we covered:

Keep a notepad handy

Lightning doodles

Cartoon over coffee

Don’t break the chain

I hope that was useful for you. I’m going to leave you with someone who would very much like the break the chain...

IMG_8798.png

Creating Different Poses For Cartoon Characters

IMG_8448.png

Gerald the Goat was having too much of an easy time of it, eating all the flowers in the garden…in the neighbour’s garden…..in any garden really…

Time to create a little tension…

Enter the leopard…

IMG_8422.png

That should liven things up a bit and give Gerald something to think about…

Recently I decided to introduce a new character to the Gerald the Goat strip. I’d drawn the snow leopard a couple of times before, but thought it would be fun to include her on a more regular basis.

I wanted to create a bank of different poses that I could choose from when drawing the strip. I draw a lot of cartoons, and so I’m really interested in trying to make the process more efficient whenever I can.

As well as having the different poses to use in the strip, I can also use them to post on social media to promote the strip.

IMG_8470.png

Sometimes if you are illustrating a long article, you may find yourself repeating a character a lot.

If you have to draw the same character again and again, it can become a little repetitive, and that can take the whole fun out of drawing.

In this article I’m going to show how you can use one drawing to easily create a variety of new poses and expressions.

Here’s the leopard as she first appeared:

IMG_8437.png

As you can see, she’s in a walking pose.

I usually save my cartoons as separate layers, so that I easily modify the outline without also having to alter the colour layer.

However, I couldn’t find the separate layers for this pose, and so I started out by creating a new outline.

IMG_8438.png

Here’s the outline. Now to create some other poses based on this one.

IMG_8439.png

I created a new layer on top of the walking pose.

I now drew the legs in a standing position. I drew them in red here so you could see more clearly.

IMG_8440.png

Here are the two poses on top of each other, so that you can see how similar they are.

I’m now going to copy and reuse the standing pose and modify it to create additional ones.

IMG_8441.png

For the yawning pose at the top, I only had to modify the head.

IMG_8442.png

The talking pose at the top right only needed slight alteration.

IMG_8443.png

The “grumbly” pose at the bottom right was the simplest yet.

IMG_8445.png

For the happy pose at the bottom right, I also altered the tail.

It looks like ad additional spot found it’s way into this one…

It looks like ad additional spot found it’s way into this one…

You can also use the above pose to generate new ones in different positions. You can see above how it was used as the basis of the learning and crouching pose.

I also used it as a reference for a completely new angle of her chewing on the boot.

Build up a bank of characters

You can use this technique to build up a bank of characters that you are refer to again and again. You can also copy and paste the characters into additional cartoons and posts if you want to save time.

Copying by hand

If you are still getting the hang of drawing a character, then I highly recommend copying the character by hand, rather than simply copying and pasting. When you are first starting to develop a character, on eof the trickiest things is getting the character’s appearance consistent from pose-to-pose. Copying by hand is a great way to practice this.

IMG_7643.png

Here’s the leopard again in a completed strip. She’s still in the zoo at this point…but for how much longer?

What’s next?

IMG_8376.png

Next week see the launch of the ‘Storytails - Storytelling for Cartoon Strips Course’. There’s still time to get on the course.

Add your name, best email address, and type ‘story’ in the subject, and I’ll send you further details.

IMG_7654.png

Social Distancing

IMG_7602.png

Social Distancing

I thought I’d do a series of pictures to hel promote social Distancing.

For advice and interviews on the COVID-19 pandemic, please see:

https://m.youtube.com/user/Campbellteaching

IMG_7598.png
IMG_7604.png
IMG_7657.png
IMG_7675.png
IMG_7677.png
IMG_7678.png

I put out a Cartoon Newsletter featuring a variety of characters and creatures. Add your name and best email address below, and I’ll wing a copy your way.

Do You Wish You Could Write Good Stories?

IMG_7643.png

Have you ever looked at a cartoon strip and thought “I wish I could come up with stories like that?”

It would be really cool to come up with your own stories, to create funnier and more inventive tales for your characters to get up to.

We all know instinctively what a good story feels like.

But writing one is a different matter.

We don’t always know what the separate elements are.

We don’t understand how they work the way they do.

So how can we find out about that?

IMG_6849.png

We also know when a story doesn’t work. We’ve sat though a lousy movie, abandoned a dud book, and also looked at one of your own stories and thought “Meh!”

IMG_6850.png

But what exactly is it that should go into those three or four blank panels?

IMG_6977.png

Staring at a blank page or screen won’t help a story to materialise out of thin air…

IMG_7261.png

…and will only lead to frustration and perhaps a desire to snack out...

What about inspiration?

IMG_7256.png

Relying on inspiration is not a good idea….

IMG_7257.png

…you can die of old age before inspiration strikes.

It would be neat to have resource that can help show what a good story is…

IMG_6962.png

…to show the basic building blocks of story structure.

Introducing the Storytelling for Cartoon Strips Course

The Storytelling for Cartoon Strips Course will give you the basic nuts and bolts of story structure to apply to your own cartoon strips. Whether you’ve already tried drawing a cartoon strip, or this is something you’re trying for the first time, the course will help you to create funnier and more interesting situations for your characters.

It’s not rocket surgery.

IMG_7460.png

Once you get the hang of the basic structure, it’ll make it a lot easier for you to regularly create your own strips.

Here’s some of the stuff we’ll cover in the course.

1. Creating tension

Life is not always a bed of roses (although Gerald wishes it was…). And so it is in cartoon strips as well. We’ll look at how you can create some excitement in your strips, to from this…

IMG_6971.png

A bit boring really…

IMG_6972.png

…so something that’s more exciting!

2. Coming up with ideas

IMG_7463.png

And if you’re stuck for ideas…

IMG_0946.jpeg

... I’ll help you come up with some so that you can spend more time creating stories and drawing, and less time scratching your head.

3. Story structure 

IMG_7263.png

We’ll cover over the basics of story structure to help you make your cartoon strips enjoyable and logical for you and your reader.

4. Creating a world for your story

IMG_7455.png

Whether it’s set in a home or somewhere more exotic, you need a world to set your story in.

5. Creating a cast of characters

IMG_7454.png

You’ll need some characters to tell your story about, so we’ll look at how to create a cast of them.

How the course works

Supervised daily practice

You can read about stuff and think about stuff, but in the end, it’s doing stuff for yourself that builds skill. The Idea-Nator course enables you to practice cartoon drawing ideas five days a week, and put what you are learning to good use. I’ll help to keep you on track.

Sharing your ideas in the forum

IMG_6987.png

You’re not going through this course alone. As well as the support of the tutor, you’ll be able to see how the other students are doing as well. It’s a rare opportunity to share ideas and help each other out during the course. Who knows what idea they might come up with? That’s part of the fun of doing a course with a group of people.

1) When does it begin and what is the duration? 

The course starts 13 April 2020 and runs till 22 June 2020. Four solid weeks of teaching, with a week at the start to get to know your fellow students and to ramp up to speed, and a week at the end to clear up any lingering problems and (very important) map your way forward.

2) What materials will I need?

Whatever you normally draw with. It can be pencil and paper, pen and ink, watercolours, digital devices. As long as you can take a photo or save an image and upload it to the forum, you’re good to go!

3) How is the course conducted?

Assignments are a combination of notes, examples and exercises in a private forum, and feedback is provided daily from the tutor . No need to be available at any particular time, simply show up in your own time zone and post your work for Rob’s feedback. Then take a look at your team mates’ work each day to amp up your own learning and inspiration. You can also ask questions if you need to check your understanding.

4) How much time will I need each day?

15-30 minutes to think and draw, Monday to Friday. Plus time to visit some of your fellow students to absorb inspiration and learn subconsciously from their efforts. So ideally, 30 minutes. Interestingly, having a time limit actually makes you more creative, not less. Handy! You’ll be surprised.

5) Is there a money-back guarantee?

I work 1:1 with every participant daily and we limit the numbers to a maximum of 10. If you show up and do the work, I know you’ll make superb progress. So no, there’s no money-back guarantee on this one.

6) How do I join? Where do I pay?

The course is $200.

This includes:

  • 6 weeks supervised coursework, Mon-Fri

  • Storytelling for Cartoon Strips ebook

  • Rob’s ‘exit output’ — individual guidance about ‘where to from here’ to ensure your skills keep growing beyond the course.

Please send your payment to my PayPal account at:

ottops123@yahoo.co.uk

Here’s what some folks who’ve done some previous cartooning courses had to say:

I loved how Rob broke everything down into simple blocks. I tend to spend all my time concentrating on getting technically good {at cartooning} so coming up with ideas was just another (hard) thing to do. Rob made it much easier.”

IMG_7470.jpeg

Vicky Fraser — Herefordshire, UK — Moxie Books - student on the ‘Get Gagging - cartoon ideas course’

“Rob creates an atmosphere that is both fun and relaxing

Before each section he explains the purpose of the exercise and the importance of the small details.

He takes time to listen and address each question.

Even though I’m not the most talented artist I could gain confidence in my drawings.”

IMG_7469.png

Jack Barker Tokyo, Japan - Jack’s English Room - participant in Cartoon Workshop

IMG_7471.png

PS.

Some of you already familiar with Gerald the Goat. He’s going to be the teacher’s pet again on this course, so keep an eye on your flower beds…

IMG_6988.png

Cartoons and Monsters

Picture this, you’re rummaging around a charity shop, you’ve perhaps looked at the books, rummaging through the clothes racks hoping to find an interesting jacket next to nothing, and then just out of curiosity take a look through a small stack of landscape paintings. The pictures are the sort knocked up by  hobby-painters, no great works of art here, but probably created with a lot of enthusiastic, maybe as a result of doing a course or reading a book. But suddenly in amongst the lakes, and country scenes, there is a large brown comical-looking monster looming over the mountains...

IMG_7022.jpeg

Welcome to the art of Chris McMahon. This artist frequents garage sales, thrift stores and charity shops looking out for abandoned paintings. These forgotten works are then given another chance to be appreciated by the addition of a monster to the scene. The monsters blend into the original settings by carefully matching the paint used by the previous artist, for example, acrylic or oil.

IMG_7023.jpeg

I had so much fun looking at these pictures that I thought I would create my own version.

IMG_7024.jpeg

Instead of using original abandoned paintings, I thought I would create some natural scenes of my own with nothing much going on in them, and then see what I could get up when enhancing them. I thought I’d include a person in the scene as well, not really doing anything dynamic.

As well as making merry with the monsters and such like, I thought it would give me a good excuse to work on backgrounds.

On Chris’s site, there is a gallery of land monsters and another of sea monsters, so I thought I would create one picture for each. I didn’t quite make it to the sea, but the picture I went for included a lake, so that’s kind of close.

The Canoe Trip

IMG_7179.png

For the first one, I created this scene of a woman just returning from a canoe trip. There’s nothing particularly exciting or interesting about this scene. As the paintings that Chris chose to use as his starting point were nothing spectacular, I thought I would also choose setting that were somewhat humdrum.

Once I’d created the initial picture to base it one, it was easy enough to drop different monsters into it. That’s the beauty of working with layers digitally.

To get a few ideas flowing, I thought I’d start with a mindmap.

Mindmapping ‘The Lake’

IMG_7269.png

I colour-coded the mindmap to make it easier to refer to. I started off in red writing down some of the key areas of the scene. I then put down some possible ideas for each area. Finally, I made a a few comments in green.

Doodling out some thoughts

IMG_7278.png

Working with a few of the ideas from the mindmap, I made a few random doodles to explore what they might look like. There was nothing organised or orderly about this process, it was just a case of doodling whatever came to mind.

Enter Zoltar The Unflappable

IMG_7180.png

I immediately thought of adding a dragon to the background and I first toyed with the idea of having it stride alongside the shoreline. However, I thought a dragon in full flight was cooler, so I added Zoltar zooming along at low-level.

Sue had to cut her canoe trip short due to a pair of battling Giant Squid in the lake.

Sue had to cut her canoe trip short due to a pair of battling Giant Squid in the lake.

I really liked the idea of some sort of monster emerging from the lake, however, I wanted to avoid the obvious one of a Nessie-type creature, so I thought I’d wrack my brain for something a little different.

I’d drawn giant squid previously, so I thought I’d requisition this pair from a previous pic.

*When I was toying this, I ended up with ‘giant squirrel’ instead of ‘giant squid’, which come to think of it is even more interesting….maybe I should draw that one as well…

The Frizzy-Created Yerble

While out for a paddle, Sue was joined by a flock of the exceedingly rare Frizzy-Crested Yerble.

While out for a paddle, Sue was joined by a flock of the exceedingly rare Frizzy-Crested Yerble.

This last one was just a bit of pure silliness.

I first thought of having a group of pelicans take over the canoe. Then I thought about geese instead, as I’m rather fond of drawing them. However, I thought it would be even more fun to create an entirely new bird species altogether, and hence the ‘Frizzy-Crested Yerble came into existence.

IMG_7183.png

In the first version of the Yerble picture, all of the action and attention was on the left side of the panel. I tried a new version zooming in and also stretching the picture slightly.

Once I’d created the initial picture to base it one, it was easy enough to drop different monsters into it. That’s the beauty of working with layers digitally.

Geese. Yes, I know that they’re not monsters, but I’ve always enjoyed drawing geese, so I couldn’t resist drawing this one.

I initially tried dropping some black silhouettes in but they seemed a bit too jarring. I recalled how when McMahon did his pictures, we was creatures to blend his additions in to the original setting, so as to make a seamless picture.

Not just monsters, but also a more comical effect

The tree

IMG_7178.png

This was based on a fashion pose. Originally it was more portrait style, but I modified it into a landscape.

As with ‘The Canoe Trip’ scene above, I did a mindmap to generate some ideas.

Mindmapping ‘The Tree’

IMG_7272.png

Doodling out some ideas

IMG_7277.png

I immediately liked the pose of the Bigfoot, so I had to draw that one!

The Ent

IMG_7186.png

I probably could have justified watching ‘The Lord of The Rings’ as background research. However, as I had a lot of drawing to do, it wasn’t the best time to watch a three-hour plus movie…

Enter Bigfoot…

IMG_7280.png

I thought of having Bigfoot appear a little bigger and closer, but felt it works better if he’s slightly further back and the woman is oblivious to him.

The Giant Woodpecker

IMG_7188.png

I’ve had a lot of fun creating some new bird species over the years. Although Giant Woodpeckers already exist, I thought that I’d exagerrate it’s beak for comical effect.

Over to you

  1. So how can you apply some of these ideas to your own cartoons or art?

  2. Find a cartoon or picture with nothing much going on in it. You can use an existing one or create something new. You can even borrow a scene from someone else and then modify it.

  3. Mindmap some ideas of what you could add to the scene. If monsters are not your thing, or they’re really not appropriate for whatever it is you are creating, then think about what other bizarre things/objects you could add.

  4. Doodle out a few of the resulting ideas from the mindmap. Don’t think - just doodle it!

  5. Have fun creating whatever takes your fancy.

That’s it, I hope you enjoy the process as much as I did.

IMG_7285.png

The above cartoons were so much fun to create, that I’ll have to do some more.

I highly recommend checking out Chris McMahon’s work, it’s given me a lot of pleasure - and I’m sure it will you too.

Check his art out at:

http://www.cwmcmahon.com/home.html

And here are a couple more of his monsters that I really liked.

IMG_7025.jpeg
IMG_7026.jpeg

Aa

aaa

IMG_7286.png

Grounding Characters

Today I’m going to show how a simple line instantly grounds your character.

IMG_7106.png

Here’s Gerald walking along, at the moment there’s no line or ground under him.

IMG_7115.png

A simple line instantly stops him floating along there in space.

I drew the line on a separate layer . As Gerald was drawn on another layer, you can see parts of the line showing through Gerald’s body.

IMG_7119.png

You can either erase the parts of the line that show through, or add a separate layer between Gerald and the line, and fill in his feet in white to cover the line. So you can see the white, I added a purple layer underneath.

IMG_7117.png

If you are going to add more detail to the background, then you might as well fill in all of Gerald in white, so that when you draw the background you won’t see any of it through Gerald.

IMG_7110.png

With this one instead of a thin line I used the marker brush in Procreate, setting the opacity at 60% to create a thicker line.

IMG_7112.png

This pose of Gerald is at an angle, so I thought that a thicker line would be better than a thin one.

IMG_7113.png

I hope that has been useful.

What’s next

I put out a Cartoon Newsletter which contains a whole host of characters, as well as cartooning tips. Add your name and best email address to the box below and I’ll wing a copy your way.

IMG_6988.png

Drawing A Strip Cartoon - ‘Enter the Snow Leopard’

IMG_6935.png

Recently I’ve been thinking that I should add an antagonist to to act as a foil for one of my characters, Gerald the Goat, who tends to get a bit out of order and could do with someone to keep him in check from time to time.

At first I introduced a bull character who would chase Gerald around. However, bulls and goats are natural enemies, and so Ithought i would be more interesting to add an antagonist with more of an element of danger about them. Leopards eat goats, and so I came up with the idea of having a snow leopard occasional escape from the local zoo to bug Gerald.

After drawing the leopard in a few strips, I thought it would be fun to come up with some sort of origin story, just like you get with all the superheroes. While I havent yet delved back into the remote mountains of Afghanistan where the leopard hails from, I thought I’d start off at the zoo and see what happens from there.

Exploring ideas doodles

IMG_6955.png

Here are some really rough doodles from when I started playing around with the idea.

Mindmap

IMG_6953.png

I decided to put together a mindmap to go over some possible ideas. I colourcoded it for ease of reference.

The first idea I settled on was the leopard getting bored and attacking something in its enclosure.

Outline Sketch

IMG_6952.png

After settling on the idea, I did a rough outline sketch of how the strip would look. I used a digital 6B pencil. Using a pencil, whether a real one or digital, always feels more sketch and those I like the looseness of it when working out an idea.

Reference point picture

IMG_6936.png

I used a previous pictures of the leopard as a reference point, so that all the different poses would be consistent.

The Four Poses

IMG_6945.png

Here are the four poses of the leopard that will appear in the strip. I copied and modified the above reference picture for all of them, apart from the last one of it chewing on the boot.

Laying out the strip

IMG_6957.png

Each image of the leopard is on a separate layer. I addedthe overall frame and also the lines to divide up the panels, also on separate layers, to act as guidelines.

IMG_6937.png

I moved the images around until I was happy with the look, and then erased any overlapping. I then tidied up the panel frames.

Adding washes

IMG_6938.png

I applied the washes using the wash in Procreate, set at 30% opacity and then built up the darker tones.

Adding shadow

IMG_6939.png

I again used the wash to add the shadow using the characters. You’ll seen that in the last panel I haven’t yet finished it.

Adding the speech and finishing off the cartoon.

IMG_6935.png

I wrote all the speech on a separate layer, and then moved it around until happy with the layout. I then added the speech bubbles in the last panel.

Finally, I added some movement lines for the leopard.

To be continued…

IMG_6946.png

The leopard is still stuck in the zoo, so next I have to figure out how to break her out of there, so that she can go onto harass Gerald.

What’s next

Coming up in April is the ‘Storytelling for Cartoon Strips Course’, where I show how to use simple story structures in cartoon strips. If you’re curious to find out more, add your name and best email address to the form below, and type ‘spot’ inthe subject line.

IMG_6948.png

First Person Cartoons

Here are some cartoons from a first person or ‘headless’ perspective.

There are quite a number of first person shooter games, and you may also have used sports videos on YouTube of people using a GoPro camera to take video while they are skydiving, mountain biking or some other adventurous activity.

The pictures are all arranged in pairs of cartoons.

The first cartoon is from a first person perspective, whether from a human or animal point of a view.

The second cartoon is from a third person perspective and reveals the complete scene.

When you see the first cartoon in a pair, pause over it and try to figure out who is looking, before moving onto the second. There’s usually a clue in the pic to help you figure out what is going on.

Whose Voice?

IMG_6910.jpeg
IMG_6911.jpeg

Big Hug

IMG_6912.jpeg
IMG_6913.jpeg

Steppin’ Out

IMG_6906.png
IMG_6907.jpeg

Light-Touch Typist

IMG_6915.jpeg
IMG_6916.png

Z Circle

IMG_6908.jpeg
IMG_6909.jpeg

Coming Soon! - The Storytelling for Cartoon Strips Course

Curious?

Add your name and best email address to the course below, and type “yep!” In the subject line, and I’ll send you further details when they become available.

Odd Stock Images

A further look at some odd business stock Images, there seems to be a never-ending supply!

IMG_6331.jpeg

Here an eager office worker is enthusiastically carrying an large stack of folders.

IMG_6332.jpeg

Her trip back to her cubicle is interrupted by an exceedingly rare Paperback Eagle swooping in through an open window and alighting on the pile.

Vital report

IMG_6831.png

A lot of these business-stock folks spend a lot of time looking intently at reports. I’m not sure what’s contained in the reports, as they are often smiling gleefully while perusing.

IMG_6830.png

Sometimes their attention is so wrapped up in the words and charts that they fail to notice other events going on around them. In this case the appearance of an exceedingly rare Zibble-zibble Spider who seized the opportunity to find some lining for its lair.

Shake it up

IMG_6829.png

Another thing that pops up frequently in business stock images is lots of hand shaking, always done with much pleasure.....ecstatic pleasure...of the slightly scary variety.....

IMG_6828.png

Here our business chap is thrown for a curve ball when he encounters Oswald. Which one should he shake first? This was never converted in the seminar...

Halibut

IMG_6795.jpeg

Some people like to signal their power during a handshake by gripping the other person’s hand and shaking it like a dead fish. Here Terrence is attending a workshop to work on this very skill. Running the workshop is Phylis, who supplements his fish monger’s business with occasional corporate training.

Stand fast!

IMG_6225.jpeg

A further recurring idea that pops up in business stock images are various bods standing in line....for no apparent reason. It’s not as though they’re lining up to get their morning coffee, or queuing at a train station, no, they’re just standing there....smiling....

IMG_6226.jpeg

Unfortunately in this case, their contemplative queuing was interrupting by Albert, who decided that their row of heads made perfect stepping stones to get from one end of the office to the other.

Coming Soon!

In April I’m launching the ‘Storytelling for Cartoon Strips Course’. If you’re curious to find out more, add your details below and type ‘yep!’ In the subject box, and I’ll send you more information when it becomes available.

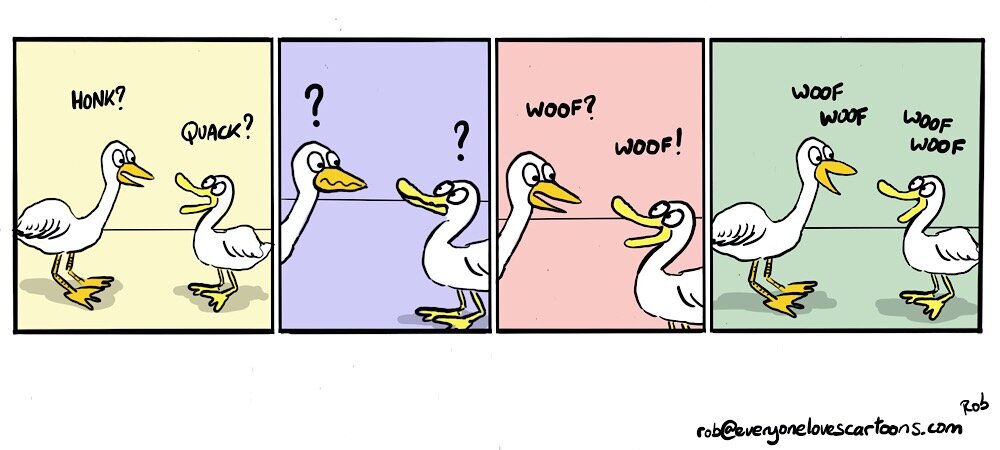
Creating a Cartoon Strip - Woof!

IMG_6642.jpeg

Years ago I went on a trip to Spain with a friend of mine. We travelled by ferry from Portsmouth in the the south of England, to Santander in the north of Spain. It was a bit rough crossing the bay of Biscay, and so neither of us ate much during the crossing. By the time we got to Spain around 3pm in the afternoon, we were both pretty hungry. The only problem was that due to the time of day, there was no where open to eat apart from a McDonalds. The only alternative we could find was a Chinese restaurant. 

As it was out first trip to Spain, and neither of us spoke any Spanish, communicating at first proved to be a bit of a problem. The staff spoke no English, and we spoke neither Spanish or Chinese. Fortunately for us, one of the Chinese staff used to work at a restaurant in France and so we were able to speak in French. Two English guys speaking French in a Chinese restaurant in Spain...

Anyway, I toyed with how a couple of animals might care being in a similar situation.

How I came up with the idea

I thought I’d pick a couple of animals that look similar and so I chose a duck and goose.

I’m currently putting together some illustrations to go with the upcoming ‘Storytelling for Cartoon Strips Course.

I wanted to include some examples of how you can tell a story without any words and so I thought this cartoon fitted the bill. (Let’s see how many duck and geese gags I can come up with in the rest of this article.

Initial rough sketch

IMG_6791.jpeg

Even though I’m working digitally here, and I can easily undo errors, I prefer to use a 6B pencil as it just feels more, well, “sketchy”. And that seems to loosen up both my doodling and my thoughts.

Initial layout sketch

IMG_6792.jpeg

I thought this would work over four panels, so I did some quick thumbnails to get an idea of how it would look.

Outlining the characters

IMG_6637.jpeg

I’ve now outlined the characters for each panel. Each pair was drawn on a separate layer. I copied the characters from layer to layer and then modified their features.

Creating the layout

IMG_6636.jpeg

The pairs are still on separate layers, which explains why you can see some of the elements overlapping.

Finalising the layout

IMG_6638.jpeg

I’ve now settled on the layout and erased all the overlapping lines.

Col0uring the characters

IMG_6639.jpeg

I initially toyed with the idea of colouring the characters perhaps with the duck being represented by a mallard. However, I liked the idea of the pair having the commucation problem despite the fact that they looked quite similar. So I decided to keep their bodies white, but to colour their beaks, bills, and feet differently.

Adding shadow

IMG_6640.jpeg

Before I added coloured backgrounds I thought I might keep the use of colour to a bare minimum and just add a little shadow under the characters.

Adding a green background

IMG_6641.jpeg

When I first thought about adding colour to the background, I thought I’d just add some green to imply a natural setting.

Adding the coloured panel backgrounds

IMG_6642.jpeg

I mentioned above that I’m using this cartoon to help illustrate a course on Storytelling for Cartoon Strips. One of elelements of the course is the three act story structure. I thought it would be useful to show how the structure breaks down by colouring each panel differently to represent each act. This example doens’t quite fit into this pattern, but it does help to differentiate what is going on in each individual panel.

Alternative background

IMG_6643.jpeg

I thought I’d try one alternative background with only half of each panel coloured, but I think I prefer the full panel version.

What’s next

In April I’m running the ‘Storytelling for Cartoon Strips Course’. To find out more information what it’s available, add your name, mail, and type ‘story’ in The subject line.

IMG_6794.jpeg

Daily Drawing Practice - Emotions - 2

IMG_6775.jpeg

Today’s daily practice followed on from yesterday’s work with emotions.

In case the writing on the pics is a little difficult to read, I’ve listed the steps again.

  1. First, I I tried to draw all eight emotions from yesterday.

    I got six of them.

  2. I then added three more: ‘withdrawn’, ‘stubborn’, and ‘shy’.

  3. Next, I covered up the new emotions and drew them again.

  4. After that I thought I’d go back over the ones from yesterday and add figures to the faces.

What’s next

I put out a Cartoon Newsletter, with a whole host of characters, as well as occasional cartooning tips. Add your name and mail to the orange box below, and I’ll wing a copy your way.

IMG_6777.jpeg

Daily Drawing Practice

Drawing emotions - part 1.

The first two steps using only dots and lines for the faces.

The first two steps using only dots and lines for the faces.

Although I draw every day, I thought it would be a good idea to get into the habit of doing some daily practice focusing on one particular area.

For this first one I chose to work on emotions, because I wanted to expand the range of emotions that I can draw from memory.

I set a timer and grabbed my pad, as I thought it would be fun to do it old school as opposed to on the iPad Pro.

I’ve listed the steps in case the pics are a bit difficult to read.

  1. First I drew eight different emotions using a reference pic. The emotions were: joy, anger, trust, anticipation, sadness, fear, distrust, and surprise. I stripped the drawings down to the bare basics of dots and lines.

  2. Next I looked them for a minute, and then covered them up and tried to draw them from memory using only the list of emotions.

  3. After that, I drew them again, this time not even looking at the list.

  4. I now drew them for a third time adding a little more detail to the faces, rather than just dots and lines.

  5. Finally, I drew them once more added more detail still.

The next three steps, adding more detail.

The next three steps, adding more detail.

I’ll review them again later and see how many I can recall.

Note: It might have been better to choose less than eight, as between three and seven is the optimal number for working memory.

To be continued!

I put out a Cartoon Newsletter with a whole host of characters, as well as cartooning tips. Add your name and mail to the orange box below and I’ll wing a copy your way.

Cheers!

Illustrated Booknotes - Bird by Bird

IMG_6694.jpeg

Every month I put together a series of Illustrated Booknotes on books that I’ve read and are useful to me.

This month we’re looking at ‘Bird by Bird by Anne Lamott - ‘Some Instructions on Wirting and Life’

About Anne Lamott

Anne Lamott

Anne Lamott

Anne Lamott is the author of several novels including Rosie, Joe Jones, and All New People. She also teaches writing in California.

How to use these booknotes

You may find it helpful to substitute the word ‘writing’ for ‘drawing’ or whatever artistic pursuit or passion you follow. I find that her instructions are applicable to many areas and not just writing.

For these booknotes, I would recommend taking one or two points that stick with you, and then trying to put them into practice. As with anything, unless you try it out for yourself, reading alone won’t take you anywhere.

These booknotes are listed in the order I read them. I selected them because they resonated with me.

And now, the booknotes…

IMG_6657.jpeg

He could go anyplace he wanted with a sense of purpose. One of the gifts of being a writer is that it gives you an excuse to do things, to go places and explore. Another is that writing motivates you to look closely at life, at life as it lurches by and tramps around.

Writing taught my father to pay attention.

James Thurber - image from Thurber House

James Thurber - image from Thurber House

Thurber was right when he said, “You might as well fall flat on. your face as lean over too far backwards.”

IMG_6601.jpeg

We all ended up just the tiniest bit resentful when we found the one fly in the ointment: that at some point we had to actually sit down and write.

I understood immediately the thrill of seeing oneself in print. It provides some sort of primal verification: you are in print; therefore you exist.

Seeing yourself in print is such an amazing concept: you can get so much attention without having to actually show up somewhere.

“A life orientated to leisure is in the end a life orientated to death - the greatest leisure of all.”

He could take major events or small episodes from fail y life and shade or exaggerate things in such a way as to capture their shape and substance,  capture what life felt like.

Do your scales everyday

IMG_6544.jpeg

“Do it everyday for a while....Do it as you would scales on the piano. Do it by prearrangement with yourself. Do it as a debt of honour. And make a commitment to finishing things.”

Hope begins in the dark, the stubborn hope that if you just show up and try to do the right thing, the dawn will come. You wait and watch ad work: you don’t give up.

Writing has so much to give, so much to teach, so many surprises. The thing you had to force yourself to do. - the actual act of writing - turns out to be the best part. It’s like discovering that while you thought you needed the tea ceremony for the caffeine, what you really needed was the tea ceremony. The act of writing turns out to be its own reward.

IMG_6546.jpeg

It’s because and I want to and I’m good at it.

When my writer friends are working, they feel better and more alive than they do at any other time. And sometimes when they are writing well, they feel that they are living up to something. It is as if the right words, the true words, are already inside them, and they just want to help them get out. Writing this way is a little like miking a cow: the milk is so rich and delicious, and the cow is so glad you did it.

Good writing is about telling the truth.

Bathing a cat

IMG_6690.jpeg

After a few days at the desk, telling the truth in an interesting way turns out to be about as easy as bathing a cat.

“I don’t even know where to start”

Start with your childhood. Write down all your memories as truthfully as you can. Flannery O’Conner said that anyone who survived childhood has enough material to write for the rest of his or herr life.

Scratch around for details: what people ate, listened to, wore.

IMG_6654.jpeg

Remember that you own what happened to you.

You sit down. You try to sit down at approximately the same time every day. This is how you train your unconscious to kick in for you creatively.

You cannot will this to happen. It is a matter of persistence and faith and hard work. SO you might as well just go ahead and get started.

Sit there long enough

IMG_6587.jpeg

All I know is that if I sit there long enough, something will happen.

The problem that comes up over and over again is that these people want to be published. They kind of want to write, but they really want to be published. You’ll never get to where you want to be that way. There is a door we all want to walk through and writing can help you find it and open it.

What’s real is that if you do your scales every day, if you slowly try harder and harder pieces, if you listen to great musicians play music you love, you’ll get better.

IMG_6547.jpeg

The two single most helpful things I can tell you about writing

Short assignments

I put a one-inch picture frame on my desk to remind me of short assignments. It reminds me that all I have to do is to write down as much as I can see through a one-inch picture frame.

Writing a novel is like driving a car at night

IMG_6545.jpeg

E.L Doctorow once’s said that “writing a novel is like driving a car at night, You can only see as far as your headlights, but you can make the whole trip that way.” You don’t have to see where you’re going, you don’t have to see your destination or everything you will pass along the way. You just have to see two or three get ahead of you. This is right up there with the best advice about writing, or life, I have ever heard.

IMG_6652.jpeg

Becoming a writer is about becoming conscious. You have the ability to throw the lights on for your reader.

G.K. Chesterton - image from Britannica

G.K. Chesterton - image from Britannica

“Hope is the power of being cheerful in circumstances that we know to be desperate.” - G. K. Chesterton

Summary

I hope these Illustrated Booknotes have been useful to you.

I highly recommend picking up your own copy of ‘Bird by Bird’, it’s a very entertaining read as well as containing lots of useful instructions on writing that can also be applied to other arts and passions as well.

What’s next

I put out a Cartoon Newsletter containing a whole host of characters and occasional cartooning tips. Add your name and mail to the orange box below and I’ll wing a copy your way.

IMG_6560.jpeg

Creating A Cartoon Strip - Gerald’s Train Ride

IMG_6583.jpeg

In this article I’m going to break down the step-by-step process of creating a cartoon strip.

How I came up with the idea

I spend a lot of time travelling on trains as I’ve got a pretty long commute. One day I started pondering how how a train journey might go with Gerald onboard, and so I thought I’d explore this idea.

Initial rough sketches

IMG_6563.jpeg

I sketched out the ideas for the four panels separately using a digital 6B pencil on Procreate. This were all saved as separate layers.

IMG_6564.jpeg

One of the beauties of working with separate layers is that it is easy to move them around and try out different layouts before committing.

IMG_6565.jpeg
IMG_6567.jpeg

Planning the layout

IMG_6568.jpeg

The layers are still separate and are shown here overlapping as I play around with the layout. I’ve now added a frame to help guide how it looks.

Adding the panels

IMG_6569.jpeg

I’ve now added the lines that will eventually divide up the panels. I’ll erase them down to size later on.

Inking the cartoon

IMG_6571.jpeg

I’ve now inked both the characters and the background. This is all still on separate layers. The frame and panels lines layers are switched off in this one.

Adding the speech

IMG_6572.jpeg

I’ve now added the narrators bubble and the speech bubbles, also with the dialogue.

Tidying up the layout

IMG_6574.jpeg

There are now separate distinct panels and I’ve eliminated any overlap from panel to panel.

Applying the washes

IMG_6576.jpeg

I’ve now started added washes using a separate layer beneath the outline layer. Next I’ll erase any parts of the wash that have spilled over.

Adding shadow

IMG_6584.jpeg

The wash is now complete. I’ve also added some shadow around the characters.

The finished cartoon

IMG_6583.jpeg

What’s next

Would you like to create your own storylines for cartoons?

In April I’m launching the ‘Storytelling for Cartoon Strips Course’, which will show you step-by-step how to creat simple stories for your characters.

To get on the waiting list, add your name and mail below, and type ‘Yes!’ In the subject line. If you’ve got any questions, please feel free to add them to the message box.

IMG_6595.jpeg
IMG_6592.jpeg

Steps To Creating A Cartoon - The Finnish Glider

IMG_6483.jpeg

The origins of the Finnish glider can be traced back to noted ski-jumper, Markku Krazinnen.

Markku was accompanied everywhere by his faithful dog Mitski, a medium-sized dog of indiscriminate breed, who had unusually loose skin.

 Everyday Mitski would follow Markku to the ski jump for his practice. On one particular morning, Mitski ventured onto the top of the slope, and unable to get a grip on the slippery surface, began to slide down. 

Mitski built up considerable speed, and upon reaching the end of the slope, became the first dog to launch themself off a ski jump. Now airborne, the loose skin between Mitski’s legs and body, got filled out by the wind to form a kind of wing, similar to that observed in flying squirrels. Moments after the start of this pioneering fight, Mitski successfully landed, although unfortunately there were no judges around to award her a score for technical excellence or artistic merit.

Fascinated by the potential of creating the word’s first flying canine, Krazinnen dedicated the rest of his life to creating the breed.

Today I’m going to talk through the process of creating this cartoon.

Pictured above is the finished cartoon. I’m now going to break down how I came up with the idea and  the step-by-step process of drawing it.

I draw all my current cartoons on an iPad Pro using Procreate.

At the end of this article, there’s also a couple of cartooning tips.

But before I get started with the drawing, how did the idea come about in first place?

IMG_6322.jpeg

I have a lot of fun coming up with new dog breeds, such as the red-spotted Dalmatian, and the Extended Dachshund. Amongst this collection of canine curiosities is the Siberian Greyhound pictured above, which I came up with a couple of years ago. This same pic helped inspired another cartoon, but that’s a story for another day.

Anyway, seeing the Greyhound towing the snowboard, it started me thinking about skiiing, which resulted in ski jumping popping into mind.

IMG_6495.jpeg

I pondered how a dog could follow it’s owner off the ski jump (as you do…) and that got me thinking that the dog would need some wings of some sort.

It was while pondering flying animals, that all the images in my rather-jumbled mind were joined by one of a flying squirrel.

IMG_6496.jpeg

In Japan, these are known as Momonga, and some are resident at Mount Takao, which is about an hour away from where I live in Tokyo. However, as flying squirrels are nocturnal and only come out at night, I yet to see one.

Anyway, I thought what if you could have a flying dog?…..and the Finnish Glider was born.

Momonga flying squirrel never actually managed to see one because they come out at night 

Initial rough sketch

IMG_6499.jpeg

This rough sketch was done with a digital 6B pencil

Inking the characters

IMG_6484.jpeg

All of my digital cartoons are built up in a series of layers. I keep them separate, rather than merge them together, so that I can use them again in future cartoons if I want to.

Adding the background outline

IMG_6485.jpeg

I liked the idea of the ski jumper and dog pointing up, while the line of the mountain range is sloping downwards.

Colouring the background

IMG_6486.jpeg

I coloured the background using a series of washes. First of all I applied some purple, using 20% opacity.

IMG_6487.jpeg

Next I added a layer of grey washes, again setting it at 20% and building up the tones.

IMG_6488.jpeg

Here are the two layers shown together.

IMG_6489.jpeg

Shown separately here is a layer of detail to add more depth to the mountain.

IMG_6490.jpeg

And here are all the background layers shown together.

Adding the sky

IMG_6491.jpeg

I thought I would keep the sky a simple uniform blue, as I didnt’ want any clouds to distract away from the jumpers.

Colouring the characters

IMG_6492.jpeg

As I wnatsed the attention to fall on the dog, I coloured in the jumper using a muted blue, which slightly blends him with both the mountain and the sky.

IMG_6493.jpeg

The dog is a brighter colour, that stand out against both the background and sky, but also the jumper. His red tongue sticking out particularly catches the eye.

Here’s the finished cartoon again

IMG_6483.jpeg

I added a few movement lines and that’s that.

Cartoon Tip

Building up a background as a series of layers can really add a lot of depth to your picture. An easy way to increase the depth of tone is simply to duplicate one of the layers.

Cartoon Idea Tip

What other winter sports could you have a play around with to generate some possible ideas?

Here are a few to think about

  • ice hockey

  • curling

  • ice skating

  • bobsleigh

  • cross-country skiiing

What’s next

I’m currently working away at the ‘Story Telling for Cartoon Strips Course’. If you’d like to find out more details, and also receive my Cartoon Newsletter, add your name and mail to the orange box below.

Happy Tooning!

IMG_6510.jpeg